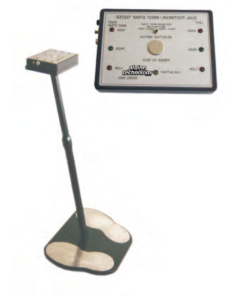
This device is manufactured according to ISO/CD8782-1 standard, can test ground resistance of hand and foot, and there is LED display and alarm. It is an absolutely necessary tester in static control, which uses 9V battery and has low voltage & safety. User can easily adjust the height of tester.
Static Shoe Tester / Wrist Strap Tester
How to Operate Device:
- To test ESD shoe/foot grounder
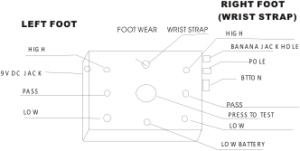
To dial “Selective Switch” to the left “Foot Wear”, stand on the testing board after wearing ESD Shoe, then press “PRESS TO TEST” key. In this way, The Left light will display the ground resistance range of left foot wearing the ESD shoe and the Right light will display the one of right foot.
- To test Anti-static wrist strap
To dial “Selective Switch” to the right “wrist strap”, and link the connector plug (or fish clip) with the jack (pole) after wearing wrist strap, then press “PRESS TO TEST” key. In this way, The Right light will display the ground resistance range of wrist strap.
Testing value antitheses Sheet:
| ITEM
RANGE LED DISPLAY |
FOOT WEAR |
WRIST STRAP |
ALARM VOICE |
| HIGH | R>100MΩ | R.>10MΩ | YES |
| PASS | R≥800KΩ
R≤100MΩ |
R≥750KΩ
R≤10MΩ |
NO |
| LOW | R<800KΩ | R<750KΩ | YES |
| LOW BATTERY | Voltage<7V,Please change battery. | ||
Note: Testing precision within +15%, to adjust by movable exactitude resistance box.
(PANEL CHART)
How to Fix:
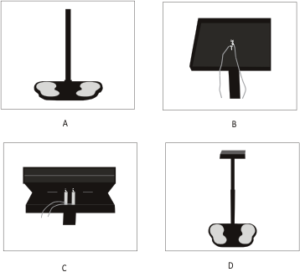
(1) Loose sleeve, and insert bracket through testing board and then screw sleeve. As the chart A.
(2) To separately fix up the linking lines on the two sides of testing board and fasten the bracked on the board. (Please well note: Two lines separately correspond two testing loops and the lines are different from the color, the blue is for the left and black for right.)
(3) Fasten tester batholith on the bracket and fetch the linking lines out. As the chart B.
(4) Insert the linking lines into the jack of tester, as the chart C, The blue lies on the left and the black is on the right. That is OK. As the chart D.
How to adjust height:
To contrarotate sleeve for several circles, and adjust the bracket to the good height, then screw the sleeve.
Hanging Installation:
In order to save time, we can use overhead installation. To take the tester out, and use another set of lines. Please install lines according to mark, another ender of line link to the soleplate. There are two nails with 86MM of distance on the wall. The user can hang the tester on the nails.
Catalog: